


Roco/Rocoline: expert guide to track geometry and turnout planning
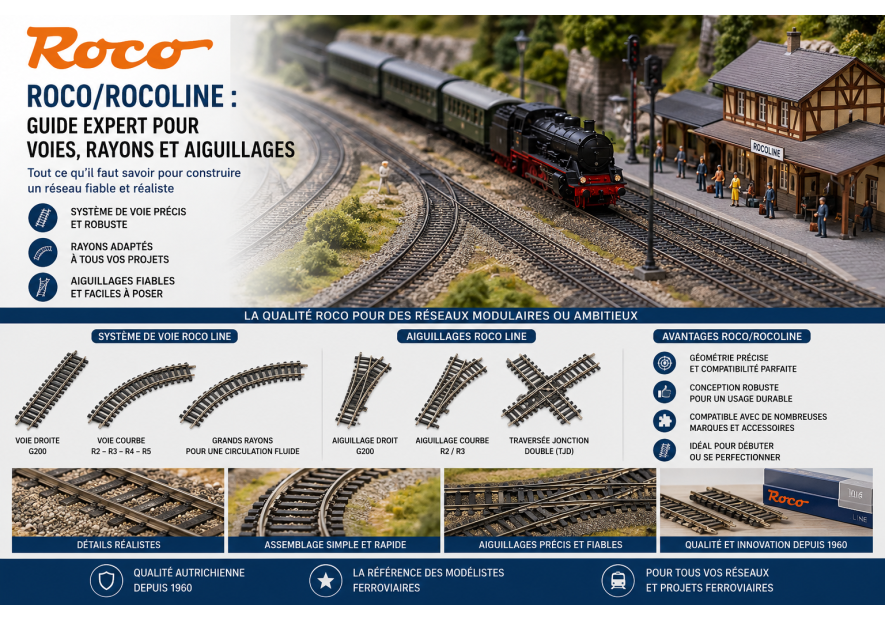
Extended Roco/Rocoline pillar: geometry method, decision matrix, practical scenarios and operation-focused FAQ.
Last updated: 2026-07-24
Quick answer
Strong Roco/Rocoline layouts are built on geometry discipline: coherent radius family, controlled turnout placement, and tested transitions. Reliability and operational clarity always outperform complexity for complexity's sake.
Why this pillar matters
Many modelers choose track parts one by one without a routing framework, then face derailment hotspots, awkward transitions, and difficult late redesign. This guide helps prevent that by linking reference choice to operational intent and geometry logic.
Table of contents
- Layout geometry principles
- 7-step planning workflow
- Radius/turnout decision matrix
- Three practical planning scenarios
- Rocoline references by use case
- Frequent mistakes and fixes
- Internal links and next actions
- Expert FAQ
1) Geometry principles
- Radius consistency: avoid rapid alternation between incompatible curvature families.
- Transition quality: protect turnout entry/exit from abrupt angle breaks.
- Functional readability: each route should map to a clear operating purpose.
- Maintenance simplicity: fewer complex nodes generally means higher long-term reliability.
2) 7-step planning workflow
- Define operation profile: compact showcase, mixed traffic, or operation-heavy layout.
- Determine your most demanding rolling stock constraints.
- Set minimum visible radius target (R3, R4, R5 depending on room and train profile).
- Design the mainline backbone first.
- Add station and yard logic second.
- Place turnouts where operational scenarios need them, not where they just fit physically.
- Run rolling stress checks on all critical transitions before locking the plan.
3) Decision matrix
| Context | Primary objective | Recommended approach | Expected outcome |
|---|---|---|---|
| Compact footprint | Space efficiency | Controlled R3 + minimal node complexity | Stable operation with compact geometry |
| Long consists | Smooth running | R4/R5 on visible routes | Better realism and reduced stress |
| Dense operation | Reliability | Progressive turnout planning + fewer crossings | Lower failure hotspots |
| Expandable layout | Future flexibility | Flexible track and modular sections | Easier iterative improvements |
4) Practical planning scenarios
Scenario A: compact display loop
Prioritize route continuity and avoid overloading with turnout trees. Maintain curve consistency for predictable running.
Scenario B: mixed passenger/freight operation
Add passing opportunities and clean station throat design. Keep switch logic readable for operation and maintenance.
Scenario C: operation-centric network
Reduce non-essential crossings and reserve complexity for true operational value. Over-complex nodes cost the most in troubleshooting time.
5) Rocoline references by use case
- Backbone flexibility: Rocoline 42400 flexible track
- Concrete sleeper variant: Rocoline 42401
- Compact curvature: Rocoline 42423 R3
- Smoother visible curves: Rocoline 42424 R4
- Main turnout node: Rocoline 42442 turnout
- Curved switching: Rocoline 42471 curved turnout
6) Frequent mistakes and fixes
- Adding turnout complexity too early. Fix: lock backbone first.
- Mixing curve families with abrupt transitions. Fix: standardize radius logic per zone.
- Stacking crossings in constrained spaces. Fix: simplify and spread operation nodes.
- Skipping real rolling tests. Fix: validate with your longest/most sensitive consist.
7) Related resources
- Brand: Roco
- Category: Rails and accessories
- Related guide: How to choose tracks
- Related guide: Build your first model railway
- Related pillar: Preiser HO realistic scenes
Sources and method
This pillar is based on live Rocoline catalog references on univers-train.com and a planning framework prioritizing reliability, readability, and maintainable operation.
Roco/Rocoline FAQ
Is R3 enough for an entire layout?
It can work for compact plans, but visible long-train routes benefit significantly from R4/R5.
When is flexible track most useful?
Use it in transitions and constrained joints to preserve smooth geometry and avoid forced angles.
How many crossings are too many?
If troubleshooting repeatedly focuses on crossings, simplify and redistribute node complexity.
Should I prioritize straight or curved turnouts?
Prioritize according to route logic and traffic intent, not catalog symmetry.
What is the most expensive planning mistake?
Late redesign of overloaded nodes. Validate critical transitions early with real rolling tests.
J+7 - 2026-07-24: Compatibility note: for longer consists on visible curves, favor R4/R5 over R3 to improve visual flow and reduce operational stress points.
Quick reference: Rocoline 42424 (R4).
Related signaling guide: HO blocks and feedback method.
